“Good bread is the most fundamentally satisfying of all foods; and good bread with fresh butter, the greatest of feasts.” -James Beard
In this post I will address safety, making a fire and cooking on it, and a bread recipe!
People Safety
When camping, safety is a big deal. There are lots of ways to get hurt and they all involve not planning and not being consistent about expectations and rules for children, and even adults. We are a scout family so we follow scout safety rules and they include:
All children wear whistles which are only used in emergencies.
Everyone has a water bottle in their bag.
Everyone has a flashlight.
Everyone wears sunblock and bug spray.
Your camp is equipped with a first-aide kit.
If swimming or in water there is a lifeguard present or someone that knows cpr.
Stay with your buddy- Have you seen scary movies?
Wear layers to maintain body temp.

Fire Safety
This is the big one. The fire at your site is the most dangerous thing. Fire can seem impossible to start, but when it’s out of control it can be impossible to put out. Like a gun, never underestimate a fire. Stay with your lit fire at all times or have someone watch it. If it is windy, be aware of how hard your fire is going, you might need to tamper it down. If there is a fire ban- do not break it. Use your propane or butane cookstove. Here is how we do our fire:
Draw a circle around your fire, about 3-4 feet from the fire. This is the line that children need to stay behind. (Unless with a very responsible adult.)
1-2 large buckets of water at all times
1 bucket of dirt (to put out fire)
1 camp shovel (to move logs or rake coals)
Always stay with the fire.
When done, always put the fire completely out.
Building and Maintaining a Fire
After you have your circle and it is clear of any fire hazards that could cause a wildfire, you can build. Start by building a fire like a tent, with a way to get air underneath your logs. I like to put a big log in the middle, then lean smaller logs on either side. Underneath the leaning small logs put your tinder- dry leaves, small sticks, a fire starter, etc. (You can make homemade starters out of empty toilet paper rolls with a candle stub in the middle, and lightly stuffed with dryer lint on each side.) On top of the tinder put larger sticks. You need the tinder and sticks to light and burn hot enough to be able to catch the big log in the middle on fire. You will need the big log to burn because it will give you embers to cook on.

Cooking with a Wood Fire
Okay, I’m not a super-experienced wood fire cook like my ancestors, but I’ll give you great advice. You will learn by doing. Get in there and try! If you are new to wood fire cooking, make your meal without the fire, and cook one thing (like dessert) with the fire. There’s nothing worse than being hungry with burned or under-cooked food and a cranky family looking at YOU! Lol.
To start with I like to have my grate next to the main fire, but separate, so I can move my smaller pieces of burning wood under with the shovel after they catch the big log on fire. The grate is where I use my skillet to cook on. I’ve tried the dutch oven here, but my food always burns on the bottom!
It always takes longer than you think to get a fire going. Give yourself extra time to get the fire ready!
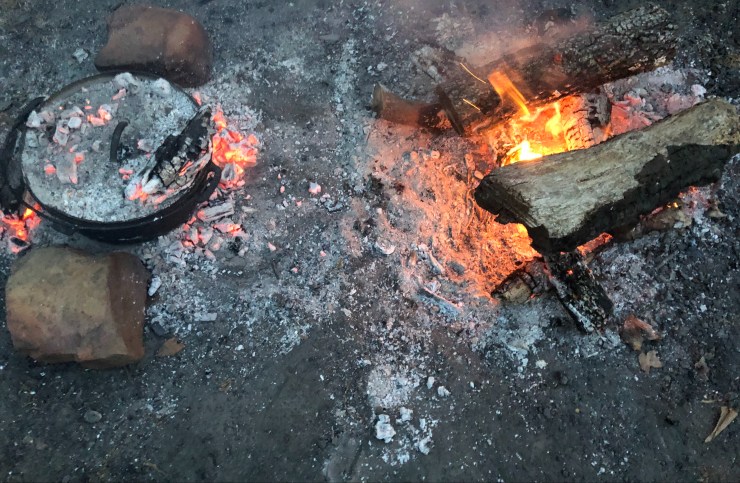
When my big log is churning along nicely I start to watch for it to die down. This is when it is ready to break into chunks of burning embers. I use the fire shovel to do that and then I make a bed of embers for the dutch oven. I also scoop up embers to perch on top of the lid. This is what has happened below:


A good rule for cooking with the dutch oven is to divide the time you are cooking into 4 parts. After each part of your time is up turn the dutch 1/4 of a turn and your lid 1/4 of a turn. So, if you had canned cinnamon rolls that had to be cooked 18-20 minutes, turn the dutch and lid about every 5 minutes.
Using a timer and checking periodically are the best ways to cook. It’s really hard to tell when things are done by smell since the campfire is so overwhelming. You will have to lift the lid and check. Things seem to burn on the bottom faster than in an oven. If this starts to happen remove the dutch oven from the embers on the ground, but leave the ones on the lid as it continues to cook until done.
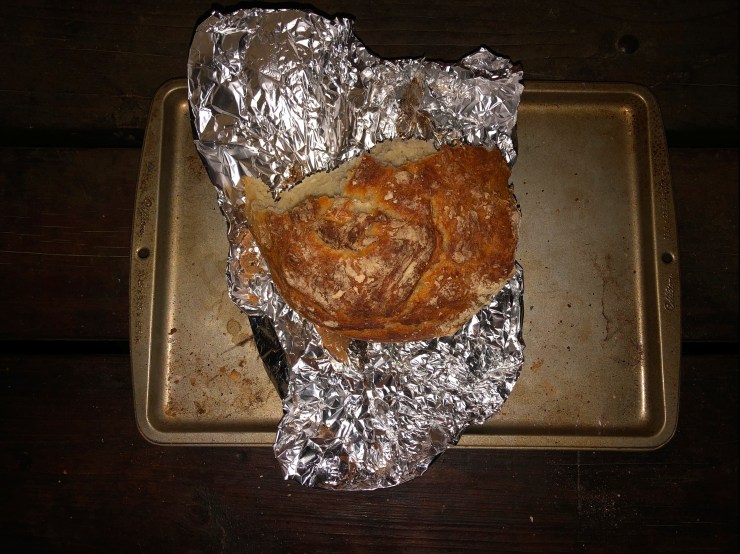
I’ve wondered what the first people to eat food made on a stove with electric or gas vs. wood thought about what the food tasted like. There is definitely a different taste to wood-cooked food than food cooked on a modern stove. Sometimes the taste can be too powerful, and sometimes, like with bread, it can taste better. Here is Jenny Jones’ fastest, easiest, no-knead bread recipe adapted for use on a wood fire:
Easiest Wood-Fired Artisan Bread
3 Cups regular flour
1 & 1/2 teaspoons salt
2 teaspoons rapid-rise yeast (use the fastest rise kind, like for bread machines)
1 & 1/2 Cups hot water (about 120 degrees Fahrenheit)
This recipe uses a cast-iron dutch oven to achieve the bread texture. I have not tried this with a Le Creuset type enameled oven, just in a regular Lodge one. I have not been able to find much information about Le Creuset being used on a campfire so I played it safe.
Before you leave for camp measure out the dry ingredients into a zip-lock bag and mix. Seal the bag and take it with you. When you are ready to bake the bread put your kettle on to warm (but not boil) your water. Put the dry ingredients in a bowl, add the hot water and mix. Cover and put in the area of your fire to stay warm while it rises an hour.
After an hour (and this is a very loose timeline- it can be way longer) put a piece of foil out and drop the dough onto it. (At home I use parchment, but foil is better over a fire and less likely to burn.) Transfer the dough on top of the foil back to the bowl. Do not knead the bread. Cover again and let rise 1/2 hour longer. Put your empty dutch oven in a bed of embers and put embers on top of the lid. Let it get warm for 1/2 hour while your bread is rising that second time.
Then, bring your bowl to the dutch oven and transfer the foil with the dough on top to the dutch oven. Cover, Return any embers that fell off the top and cook for 35 minutes, turning the whole dutch oven 1/4 the way around and then the lid 1/4 the way around about every 8 minutes. Doing this keeps any hot spots from developing and burning your bread.
Here is the best secret about this recipe. Even if you burn the bread, it is still absolutely delicious! Especially dipped in soup or tea!

Next time I’ll give you lots of ideas and recipes for camp food!
With love and camp-cooking luck to you from Kansas Street,
-Jaime

1 thought on “Camping Part II: Get Ready to Cook! (with Easiest Camp Artisan Bread Recipe)”